python爬虫
发布于2021-07-25 06:27 阅读(1005) 评论(0) 点赞(30) 收藏(2)
爬虫通过编写程序来获取互联网上的资源
web请求过程解析
1.服务器渲染:在服务器那边直接把数据和HTML整合在一起,统一返回给浏览器
特点:在页面源代码中能看到数据
2.客户端渲染:第一次请求只要一个HTMl骨架,第二次请求拿到数据,进行数据展示. 特点:在页面源代码中看不到数据(数据在第二次请求中)
所以在看不到数据的时候不要慌,再往下找找
HTTP协议
协议:就是两个计算机之间为了能够流畅的进行沟通而设置的一个君子协议.常见的协议有TCP/IP,SOAP协议,HTTP协议,SMTP协议等等
HTTP协议:超文本传输协议,浏览器与服务器之间的数据交互遵守的就是HTTP协议.
HTTP协议把一条消息分为三大块内容(无论请求还是响应)
请求:
1.请求行->请求方式(get/post) 请求url协议 协议
2.请求头->放一些服务器要使用的**附加信息**
3.
4.请求体->一般放一些请求参数
响应:
1.状态行->协议 状态码
2.响应头->放一些客户端要使用的一些附加信息
3.
4.响应体->服务器返回的真正客户端要用的内容(HTML,json)等
请求头中最常见的一些重要内容
1.User-Agent:请求载体的身份标识(用啥发送的请求)
2.Referer:防盗链(这次请求从那个页面来,反爬虫会用到)
3.cookie:本地字符串数据信息(用户登陆信息,反爬的token)
响应头中最常见的一些重要内容
1.cookie:本地字符串数据信息(用户登陆信息,反爬的token)
2.各种神奇的莫名奇妙的字符串(这个就需要经验了,一般都是token字样,防止各种攻击和反爬)
requests入门
实例代码
- 搜狗浏览器查询
import requests
url='https://www.sogou.com/web?query=%E9%87%91%E6%99%A8%E8%84%96%E5%AD%90%E6%9C%8914'
headers={
    'User-Agent': 'Mozilla/5.0 (Windows NT 10.0; Win64; x64) AppleWebKit/537.36 (KHTML, like Gecko) Chrome/90.0.4430.72 Safari/537.36'
}
res=requests.get(url=url,headers=headers).text
print(res)
2.百度翻译
#百度翻译url
'https://fanyi.baidu.com/?aldtype=16047#auto/zh'
#但他是有两个请求的那种客户端渲染,所以实际上有数据的不是他
import requests
url='https://fanyi.baidu.com/sug'
headers={
    'User-Agent': 'Mozilla/5.0 (Windows NT 10.0; Win64; x64) AppleWebKit/537.36 (KHTML, like Gecko) Chrome/90.0.4430.72 Safari/537.36'
}
chaxun=input('请输入你要查询的内容')
data={
    'kw':chaxun
}
#res=requests.post(url=url,headers=headers,data=data).text
#print(res)  这里有个问题看输出结果
请输入你要查询的内容dog
{"errno":0,"data":[{"k":"dog","v":"n. \u72d7; \u8e69\u811a\u8d27; \u4e11\u5973\u4eba; \u5351\u9119\u5c0f\.....
是个乱码
更改
res=requests.post(url=url,headers=headers,data=data).json()
print(res)   直接让他变成json数据(再python中就是字典)
{'errno': 0, 'data': [{'k': 'dog', 'v': 'n. 狗; 蹩脚货; 丑女人; 卑鄙小人 v. 困扰; 跟踪'}, {'k': 'DOG', 'v': 'abbr. Data Output Gate 数据输出门'}, {'k': 'doge', 'v': 'n. 共和国总督'}, {'k': 'dogm', 'v': 'abbr. dogmatic 教条的; 独断的; dogmatism 教条主义; dogmatist'}, {'k': 'Dogo', 'v': '[地名] [马里、尼日尔、乍得] 多戈; [地名] [韩国] 道高'}]}
3.豆瓣电影分类排行榜
注意二次请求的数据可以通过XHR进行筛选
#豆瓣喜剧排行榜url
"https://movie.douban.com/typerank?type_name=%E5%96%9C%E5%89%A7&type=24&interval_id=100:90&action="
#这个玩意是第一次发起请求对应的url,但无法获取数据
import requests
start=str((int(input('请输入你要查找的页数')))*10)
url='https://movie.douban.com/j/chart/top_list?type={}&interval_id={}\
&action=&start={}&limit={}'.format('24','100:90',start,'20')
headers={
    'User-Agent': 'Mozilla/5.0 (Windows NT 10.0; Win64; x64) AppleWebKit/537.36 (KHTML, like Gecko) Chrome/90.0.4430.72 Safari/537.36'
}
res=requests.get(url=url,headers=headers)
print(res.json())
也可以这样写
import requests
param={
    'type': '24',
    'interval_id': '100:90',
    'action': '',
    'start': '0',
    'limit': '20'
}
url='https://movie.douban.com/j/chart/top_list'
headers={
    'User-Agent': 'Mozilla/5.0 (Windows NT 10.0; Win64; x64) AppleWebKit/537.36 (KHTML, like Gecko) Chrome/90.0.4430.72 Safari/537.36'
}
res=requests.get(url=url,headers=headers,params=param)
print(res.json())
res.close()
后面记得把浏览器窗口关闭
数据解析概述
1.re解析
2.bs4解析
3.xpath解析
这三种解析方法可以混合使用
re解析
正则表达式,一种使用表达式的方式对字符串进行匹配的语法规则
优点:速度快,效率高,准确性高
缺点:新手上手难度高
关于他的相关方法直接在网上就能搜到
常用正则表达式


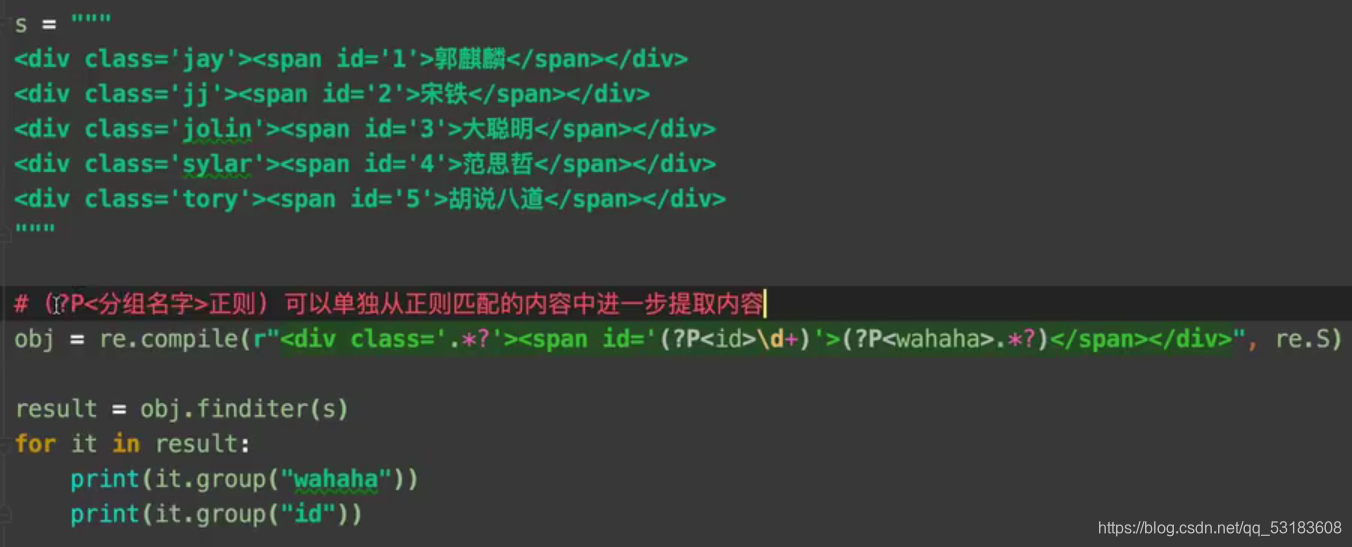
re.S的作用是让.可以匹配换行符防止断开
4.手刃豆瓣TOP250电影排行榜
里面还包含了一些xlwt模块的使用方法,以后忘记了可以看一下
大概的思路就是这个样子
import requests
import re
import xlwt
#1.爬取网页源代码
url='https://movie.douban.com/top250'
headers={
'User-Agent': 'Mozilla/5.0 (Windows NT 10.0; Win64; x64) AppleWebKit/537.36 (KHTML, like Gecko) Chrome/90.0.4430.72 Safari/537.36'
}
res=requests.get(url=url,headers=headers)
html=res.text
print(html)
#2.使用re进行解析
findname=re.compile(r' <img width="100" alt="(.*?)" src=.*?')
findneirong=re.compile(r'<p class="">(.*?)</p>',re.S)
findpjrs=re.compile(r'<div class="star">.*?<span>(.*?)</span>',re.S)
findpjfs=re.compile(r'<span class="rating_num" property="v:average">(.*?)</span>')
findpy=re.compile(r'<span class="inq">(.*?)</span>')
name=findname.findall(html)
neirong=findneirong.findall(html)
pjrs=findpjrs.findall(html)
pjfs=findpjfs.findall(html)
py=findpy.findall(html)
neirong1=[]
for i in range(len(neirong)):
a=neirong[i].replace(' ','')
b=a.replace('<br>','')
c=b.replace(' ','')
neirong1.append(c)
#3.开始向excel中写入数据
workbook = xlwt.Workbook(encoding='utf-8')
sheet=workbook.add_sheet('豆瓣TOP250',cell_overwrite_ok=True)
#注意从0 0开始
tup=('电影名称','相关人员','评分','评价人数','评语')
for i in range(len(tup)):
sheet.write(0,i,tup[i])
lis=[name,neirong1,pjfs,pjrs,py]
#开始导入数据
for i in range(20):
for j in range(5):
print(lis[j][i],end=',')
sheet.write(i,j,lis[j][i])
print()
workbook.save('E:\\2021年最新Python爬虫教程+实战项目案例(最新录制)\\爬虫文件保存\\1.豆瓣TOP250.xls')
res.close()
5.屠戮盗版天堂电影信息
这里涉及了页面的跳转,在html中a标签储存的是超链接
在这里面title是我鼠标停留时会出现的内容 href对应的时url(超链接)
这个占时看不懂也没关系,就是涉及了一个页面的跳转问题
#爬取电影天堂
#这个属于那种服务器渲染的网页
#网页源代码中有我想要的一切
#那么现在就开始了
import re
import requests
#1.获取初始网页源代码
url='https://www.dy2018.com/'
headers={
    'User-Agent': 'Mozilla/5.0 (Windows NT 10.0; Win64; x64) AppleWebKit/537.36 (KHTML, like Gecko) Chrome/90.0.4430.72 Safari/537.36'
}
res=requests.get(url,headers)
res.encoding='gb2312'
html=res.text
#2.得到想要的链接
findhrefs=re.compile(r'2021必看热片.*?<ul>(.*?)</ul>',re.S)
findhref=re.compile(r"<li><a href='(?P<href>.*?)' title=",re.S)
finddown=re.compile(r'<td style="WORD-WRAP: break-word" bgcolor="#fdfddf"><a href="(.*?)">magnet',re.S)

hrefs=findhrefs.findall(html)
hrefs=findhref.findall(hrefs[0])
    #循环获得链接
for href in hrefs:
    download='https://www.dy2018.com/'+href
#3.开始获得详情页面下载地址
    #3.1获得html
    dlhtml=requests.get(download,headers)
    dlhtml.encoding='gb2312'
    dlhtml=dlhtml.text
    #3.2得到下载链接
    down=finddown.findall(dlhtml)
    print(down)
bs4解析

通过这些找到唯一属性值
6.北京新发地市场菜价
里面还包含了一些csv模块的使用方法,以后忘记了可以看一下
如果写入文件时行与行之间有空格可以加一个newline=’’
import csv
f=open('E:\\2021年最新Python爬虫教程+实战项目案例(最新录制)\\爬虫文件保存\\北京新发地市场.csv','w',newline='')
csvwriter=csv.writer(f)
csvwriter.writerow([name,di,pj,zuigao,gui,danwei,date])
f.close()
from bs4 import BeautifulSoup
import re
import requests
import csv
f=open('E:\\2021年最新Python爬虫教程+实战项目案例(最新录制)\\爬虫文件保存\\北京新发地市场.csv','w')
csvwriter=csv.writer(f)
#1.服务器渲染  获取网页源代码
url='http://www.xinfadi.com.cn/marketanalysis/1/list/1.shtml'
headers={
    'User-Agent': 'Mozilla/5.0 (Windows NT 10.0; Win64; x64) AppleWebKit/537.36 (KHTML, like Gecko) Chrome/90.0.4430.72 Safari/537.36'
}
res=requests.get(url=url,headers=headers).text
html=res
#2.开始对源代码进行解析

page=BeautifulSoup(html,'html.parser')
neibie=page.find('tr',class_="tr_1").text.split()
csvwriter.writerow(neibie)
#获得各种菜的数据
table=page.find('table',class_="hq_table")
tr=table.find_all('tr')[1::]
for i in range(len(tr)):
    #获得当前菜品的数据
    tds=tr[i].find_all('td')
    name=tds[0].text
    di=tds[1].text
    pj=tds[2].text
    zuigao=tds[3].text
    gui=tds[4].text
    danwei=tds[5].text
    date=tds[6].text
    csvwriter.writerow([name,di,pj,zuigao,gui,danwei,date])
f.close()
7.抓取优美图库
注意乱码的处理
可以通过get直接获得属性对应的值(属性值),需要与该标签直接相邻
这里面还有一个细节:你打开pycharm的时候是会进行一个索引的.那么你保存的图片视频等是可以排除的
右键该文件->将目录标记为->已排除
图片或者其他东西的下载保存
res=requests.get(url,headers)  对图片对应的链接发起请求
with open(文件名,'wb'(二进制写入)) as f:
	f.write(res.content)
text可以获得对应的文本
主要代码
#这个网页也是那种你要的东西网页源代码都有的那种
import requests
from bs4 import BeautifulSoup
#1.获取网页源代码
url='https://www.umei.net/bizhitupian/weimeibizhi/'
headers={
    'User-Agent': 'Mozilla/5.0 (Windows NT 10.0; Win64; x64) AppleWebKit/537.36 (KHTML, like Gecko) Chrome/90.0.4430.72 Safari/537.36'
}
res=requests.get(url,headers)
res.encoding="utf-8"
html=res.text
#2.进行网页源代码解析,获取图片url
main_page=BeautifulSoup(html,'html.parser')
h2=main_page.find('div',class_="TypeList")
lis=h2.find_all('li')
for li in lis:
    imgurl=li.find('img').get('src')
    name=li.find('a').text
    img_text=requests.get(imgurl,headers)
#3.开始进行图片存储
    with open('E:\\2021年最新Python爬虫教程+实战项目案例(最新录制)\\爬虫文件保存\\{}.jpg'.format(name)\
              ,'wb') as f:
        f.write(img_text.content)
        f.close
        break
xpath解析
一些详细的方法
是在XML文档中搜索内容的一门语言
html是xml的子集
导入模块
from lxml import etree
tree=etree.HTML(html)


8.抓取猪八戒网信息
#这个网页的信息也是属于那种
import requests
from lxml import etree
#1.获得网页源代码
url='https://beijing.zbj.com/wxxcxzbjzbj/f.html?fr=zbj.sy.zyyw_2nd.lv3'
headers={
    'User-Agent': 'Mozilla/5.0 (Windows NT 10.0; Win64; x64) AppleWebKit/537.36 (KHTML, like Gecko) Chrome/90.0.4430.72 Safari/537.36'
}
res=requests.get(url,headers)
html=res.text
#2.获得每一块的数据
tree=etree.HTML(html)
shuju_kuais=tree.xpath('//div/div/div/div[3]//div[@class="new-service-wrap"]/div')
    #2.1开始进行循环
for shuju in shuju_kuais:
    name=shuju.xpath('./div/div/a[1]//p[@class="title"]/text()')
    jiage=shuju.xpath('./div/div/a[1]//span[@class="price"]/text()')
    cjl=shuju.xpath('./div/div/a[1]//span[@class="amount"]/text()')
    gs=shuju.xpath('./div/div/a[2]/div/p[@class="text-overflow"]/text()')
    didian=shuju.xpath('./div/div/a[2]/div/div/span/text()')
    print(name)
    print(jiage)
    print(cjl)
    print(gs)
    print(didian)
requests的进阶概述
1.模拟浏览器登陆->处理cookie
2.防盗链处理
3.代理->防止IP被封
模拟浏览器登陆
在模拟登陆中是需要使用session,它可以对曾经’说过的话’进行一个记录(可以携带登陆的cookie)
session=requests.session()
用法和直接requests没啥区别
9.处理cookie登陆小说网
这个也没啥好说的就是注意请求方式,参数尽量都关键字传参,不然可能会报错
#这个网站在你看书架里面有那些书的时候是会有弹窗让你输入密码的
#这时候你可以看一下这个网页的源代码,里面是没有这个的
#这也就是说你在输入密码时实际发送的请求的url并不是这个
import requests
url='https://passport.17k.com/ck/user/login'
headers={
    'User-Agent': 'Mozilla/5.0 (Windows NT 10.0; Win64; x64) AppleWebKit/537.36 (KHTML, like Gecko) Chrome/90.0.4430.72 Safari/537.36'
}
#1.进行登陆
session=requests.session()
data={
    'loginName': '19972252051',
    'password': 'qhxasjcby520ccp'
}
session.post(url=url,headers=headers,data=data)  #这里相等于登陆了
res=session.get(url='https://user.17k.com/ck/author/shelf?page=1&appKey=2406394919',headers=headers)
res.encoding='utf-8'
html=res.json()
print(html)
防盗链
10.抓取梨视频
这里面涉及的学问就多了些
一:你爬取到的url可能是经过细微改动的
真实的:https://www.pearvideo.com/videoStatus.jsp?contId=1619575&mrd=0.3659542504470019
爬到的:https://video.pearvideo.com/mp4/adshort/20210709/1626592555066-15715349_adpkg-ad_hd.mp4
二:referer这个我在最开始的时候就写过,防盗链.不是从某一页面跳转过去的就会被检测到从而无法获取数据
(可以试一下真实的url是会提示的)
三:https://www.pearvideo.com/videoStatus.jsp?contId=1619575&mrd=0.3659542504470019
https://www.pearvideo.com/videoStatus.jsp?contId=1619575&mrd=0.4872652479179649
可以看到这两个链接是不一样的,但其实他们指向的是同一个视频,所以根据我个人的经验
有时候&后面是无关紧要的东西
#1.先随便对一个视频链接发起请求
import requests
contId='https://www.pearvideo.com/video_1619575'  #主url但没数据
#https://www.pearvideo.com/videoStatus.jsp?contId=1619575&mrd=0.3659542504470019 可以通过它获得真实需要的url

contId=contId.split('_')[1]
url='https://www.pearvideo.com/videoStatus.jsp?contId={}&mrd=0.3659542504470019'.format(contId)
headers={
    'User-Agent': 'Mozilla/5.0 (Windows NT 10.0; Win64; x64) AppleWebKit/537.36 (KHTML, like Gecko) Chrome/90.0.4430.72 Safari/537.36',
    'Referer':contId
}
res=requests.get(url=url,headers=headers)
json=res.json()
#2.对获得的数据进行解析
srcUrl=json['videoInfo']['videos']['srcUrl']
systemTime=json["systemTime"]
srcUrl=srcUrl.replace(systemTime,'cont-{}'.format(contId))
with open('E:\\2021年最新Python爬虫教程+实战项目案例(最新录制)\\爬虫文件保存\\梨视频.mp4','wb') as f:
    f.write(requests.get(srcUrl,headers).content)

#https://video.pearvideo.com/mp4/adshort/20210709/1626592555066-15715349_adpkg-ad_hd.mp4  爬到的假的url
#"https://video.pearvideo.com/mp4/adshort/20210709/cont-1619575-15715349_adpkg-ad_hd.mp4"  真实的url
代理IP
11.综合练习 抓取网易云音乐评论
这个的解密还要有js的知识,我先放了
多线程
from threading import Thread #线程类

def fun():
    for i in range(1000):
        print('fun',i)

if  __name__=='__main__':
        t1=Thread(target=fun)      #函数名不需要带括号
        t1.start()  #多线程状态为可以开始工作状态,具体的执行时间由CPU决定

        for i in range(1000):
            print('main',i)
可以看一下输出结果挺乱的,原因就是输出的地方只有一个,他俩同时输出
值得注意的地方都标了一下

这个是如何传参 只能以元组形式传递
同时他还有第二种写法
class obj(Thread):
    def run(self):
        for i in range(1000):
            print('fun',i)

if __name__=='__main__':
    t=obj()
    t.start()
    for i in range(1000):
        print('main',i)
这里是用类的继承,然后把其中的run方法改一下,然后start之后默认执行的是run方法
传参的话就造一个初始化函数
多进程
他的代码和多线程的代码非常像,但需要注意的是他们本质上是不一样的
from multiprocessing import Process
def fun():
    for i in range(10000):
        print('fun',i)
if __name__=='__main__':
    t1=Process(target=fun)
    t1.start()
    for j in range(10000):
        print('main',j)
class obj(Process):
    def run(self):
        for i in range(10000):
            print('fun',i)
if __name__=='__main__':
    t1=obj()
    t1.start()
    for j in range(10000):
        print('main',j)
但是这又产生了一个问题假如说我获取了1000个url,我是要每一个url都开一个线程或者进程吗?
当这个线程结束的时候,又该怎么办呢?
线程池:一次性开辟一些线程,我们用户直接给线程池提交任务,线程任务的调度交给线程池完成

14.线程池爬取北京新发地市场数据
这里需要注意一下,如果看到tbody,要去看一下网页源代码里面有没有这个东西(一般是没有的,是谷歌浏览器自己搞得玩意),写xpath表达式的时候不要去写tbody

写代码一定要记住,先把基础的搞好,再添加一些操作.
比如这个代码,先把一个网页爬了再说别的
#先不考虑其他把单个页面的爬取写出来,再考虑换跳转页面的情况
import requests
from lxml import etree
import csv
from concurrent.futures import ThreadPoolExecutor
f=open('E:\\2021年最新Python爬虫教程+实战项目案例(最新录制)\\爬虫文件保存\\北京新发地市场(线程池).csv','w',newline='')
csvwriter=csv.writer(f)


def get_page_shuju(url):
#1.获取网页html
    headers = {
        'User-Agent': 'Mozilla/5.0 (Windows NT 10.0; Win64; x64) AppleWebKit/537.36 (KHTML, like Gecko) Chrome/90.0.4430.72 Safari/537.36'
    }
    res=requests.get(url=url,headers=headers)
    html=res.text
#2.进行解析,获取所需数据
    tree=etree.HTML(html)
    trs=tree.xpath('/html/body/div[2]/div[4]/div[1]/table/tr')[1::]
    for tr in trs:
        #2.1获取想要的数据
        items=tr.xpath('.//text()')
        items=(item.replace('\\','').replace('|','') for item in items)
#3.开始进行csv保存
        csvwriter.writerow(items)
    print(url,'over')


if __name__ == '__main__':
        #创建线程池
        with ThreadPoolExecutor(100) as t:
            for i in range(1, 200):
                t.submit(get_page_shuju,'http://www.xinfadi.com.cn/marketanalysis/1/list/{}.shtml'.format(i))
        f.close()
协程
协程本质上不同于进程和线程,他是通过程序完成的.
进程和线程相当于开路,比如说开了50条路,你走那一条都是可以的
协程是你操控不同的’人’,当你现在操控的’人’遇到IO操作时,转换操作另一个’人’,但走的都是同一条路
协程就像资本家不停的压榨CPU的性能,确保其处于工作状态
import asyncio #导入模块
异步操作里面,不能出现同步操作.time.seleep不是一个IO操作,所以不会异步执行.所以requests在这里面用不了
一般await挂起操作,放在协程对象前面
await asyncio.sleep(等待的时间)
这是一种asyncio的写法
import asyncio
import time
s=time.time()
async def fun1():
    print('aaaaa')
    await asyncio.sleep(3)
    print('aaaaa')

async def fun2():
    print('bbbbb')
    await asyncio.sleep(2)
    print('bbbbb')

async def fun3():
    print('ccccc')
    await asyncio.sleep(4)
    print('ccccc')

if __name__ == '__main__':
    f1=fun1()
    f2=fun2()
    f3=fun3()
    tasks=[
        f1,f2,f3
    ]
    asyncio.run(asyncio.wait(tasks))
    print(time.time()-s)
这是另外一种写法,会写一个协程主函数
async def fun1():
    print('aaaaa')
    await asyncio.sleep(3)
    print('aaaaa')

async def fun2():
    print('bbbbb')
    await asyncio.sleep(2)
    print('bbbbb')

async def fun3():
    print('ccccc')
    await asyncio.sleep(4)
    print('ccccc')

async def main():
    tasks=[
        fun1(),fun2(),fun3()
    ]
    await asyncio.wait(tasks)
if __name__ == '__main__':
    asyncio.run(main())
    print(time.time()-s)
模拟爬虫代码
#模拟一下爬虫的代码
async def download(url):
    print('正在准备下载')
    await asyncio.sleep(2)   #遇到阻塞操作
    print('下载成功')

async def main():
    urls=[
        '1111111111111111111',
        '22222222222222222222222',
        '333333333333333333333'
    ]
    tasks=[]
    for url in urls:
        d=download(url)    #这里并不会去调用函数
        tasks.append(d)
    print(tasks)
    await asyncio.wait(tasks)
if __name__ == '__main__':
    asyncio.run(main())
有一个问题,就是3.8之前的python会帮你自动转化成task对象,但是现在需要你自己转化
就是说
tasks这个列表里面需要放的是asyncio.create_task(fun())
因为requests.get()是同步操作,无法在异步中使用,所以需要一个新玩意
aiohttp
import asyncio
import aiohttp
headers={
    'User-Agent': 'Mozilla/5.0 (Windows NT 10.0; Win64; x64) AppleWebKit/537.36 (KHTML, like Gecko) Chrome/90.0.4430.72 Safari/537.36'
}

urls=[
    'http://kr.shanghai-jiuxin.com/file/2020/0806/small5fa613a6911d1d83374fa129a030c956.jpg',
    'http://kr.shanghai-jiuxin.com/file/2020/0807/small17faef411f20644e2e3e353e6315f475.jpg',
    'http://kr.shanghai-jiuxin.com/file/2020/0807/small393f1cb4d5baebab6be3035cb8fa79d5.jpg'
]

async def download(url):
    name=url.split('/')[-1]
    async with aiohttp.ClientSession() as session:
        async with  session.get(url,headers=headers) as res:
            print(name)
            with open('E:\\2021年最新Python爬虫教程+实战项目案例(最新录制)\\爬虫文件保存\\{}'.format(name)\
                      ,'wb') as f:
                f.write(await res.content.read())
    print(name)

async def main():
    tasks=[]
    for url in urls:
        tasks.append(asyncio.create_task(download(url)))
    await asyncio.wait(tasks)
if __name__ == '__main__':
    asyncio.run(main())
有问题写的,会报错
17.aiohttp抓取西游记
感觉爬到的url有问题的时候可以赋值粘贴到浏览器看一下
一是可能经过更改如梨视频
二是他可能复制的时候自动变了一下看着别扭
‘https://dushu.baidu.com/api/pc/getCatalog?data={%22book_id%22:%224306063500%22}’
可以赋值着看一下,%22 是 "
CTRL+f的查找必须是已经出来的,直接可以看到的
小细节注意看最下面的滑轮,如果你要找的数据非常长一定要注意

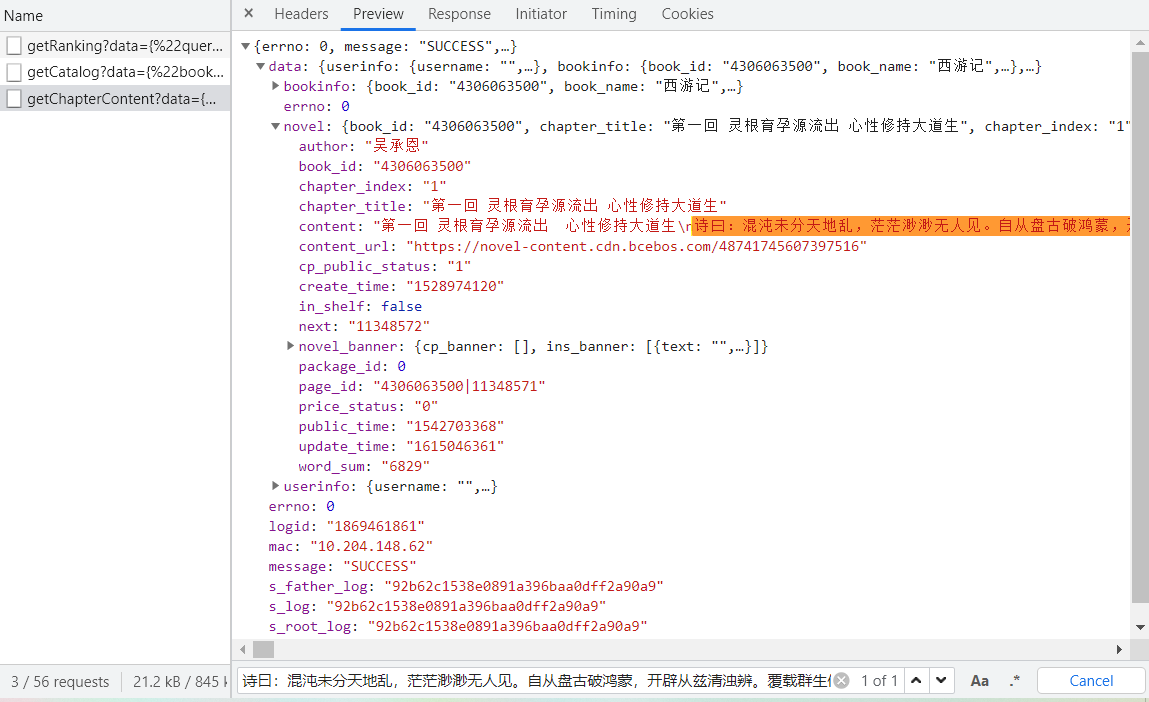
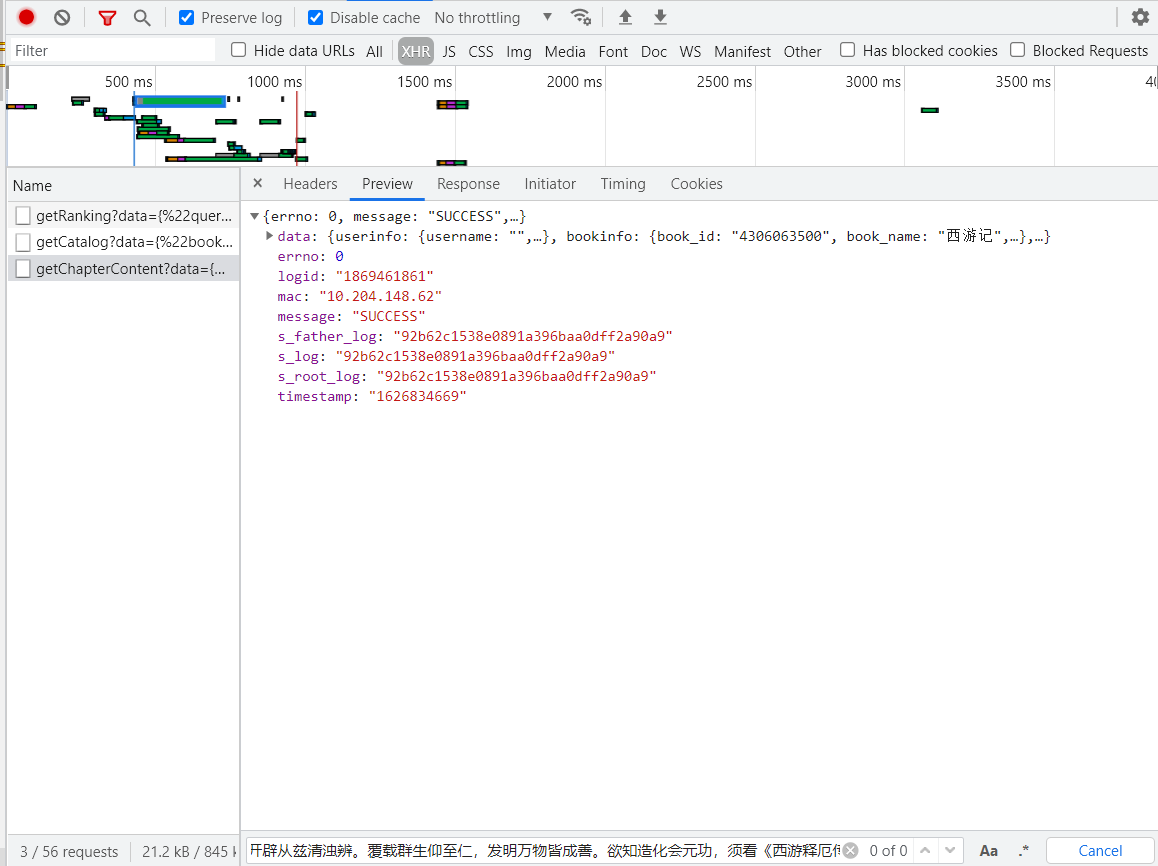
费劲千辛万苦终于是爬下来了,以后的话更多是去使用线程而不是异步,我觉得快是快不好用
值得注意的是await什么时候写 ,除了像数据的获取, dic=await res.json()是需要写await的
#首先他的内容并没有放在网页源代码里面所以请求的网页是这个
'https://dushu.baidu.com/api/pc/getCatalog?data={"book_id":"4306063500"}'
#第一回的网页链接
import json

'https://boxnovel.baidu.com/boxnovel/content?gid=4306063500&cid=11348571'
#但同样的上面那个链接里面没有数据
'https://dushu.baidu.com/api/pc/getChapterContent?data={%22book_id%22:%224306063500%22,%22cid%22:%224306063500|11348571%22,%22need_bookinfo%22:1}'
#这个才是实际的
#可以看到有两个数据gid和cid都是会变的
#所以先通过网页源代码获取cid

import requests
import aiohttp
import asyncio

headers={
    'User-Agent': 'Mozilla/5.0 (Windows NT 10.0; Win64; x64) AppleWebKit/537.36 (KHTML, like Gecko) Chrome/90.0.4430.72 Safari/537.36'
}

async def download(title,bookid,cid):
    data = {
        'book_id': bookid,
        'cid': '{} | {}'.format(bookid, cid),
        'need_bookinfo': 1
    }
    data=json.dumps(data)
    url=f'https://dushu.baidu.com/api/pc/getChapterContent?data={data}'
    print(url)
    async with  aiohttp.ClientSession() as session:
        async with  session.get(url=url,headers=headers) as res:
            dic=await res.json()
            with open('E:\\2021年最新Python爬虫教程+实战项目案例(最新录制)\\爬虫文件保存\\西游记\\{}.txt'.format(title)\
                      ,'w') as f:
                f.write(dic['data']['novel']['content'])
async def getCatalog(bookid):
    #先对最外层url发起请求,只需要一次可以获得所有的章节cid
    url='https://dushu.baidu.com/api/pc/getCatalog?data={"book_id": '+bookid+'}'
    html=requests.get(url,headers).json()
    items=html['data']['novel']['items']
    tasks=[]
    for item in items:
        title=item['title']
        cid=str(item['cid'])
        #创建任务对象并放在列表中
        tasks.append(asyncio.create_task(download(title,bookid,cid)))
    await asyncio.wait(tasks)
if __name__ == '__main__':
    bookid='4306063500'
    asyncio.run(getCatalog(bookid))
如何抓取一部视频
一般的视频网站是怎么对视频做处理的
首先你当然是可以直接这样直接把视频放在链接中
但这样意味着不论多大的视频你都需要去加载完,拖动时也需要把前面的先加载了
着对于用户来说太慢,对于老板来说太费钱.
所以在一般情况下视频网站是这样做的
用户上传视频–>转码(把视频做处理,2k,1080,标清)–>切片处理(把单个文件进行拆分)
切片处理:如60分钟视频裁成1分钟一份这样可以得到60拖到那就请求那
需要一个文件记录:1.视频播放顺序 2.视频存放路径
M3U8 txt json -->文本
1.找到m3u8(各种手段)
2.通过m3u8下载到ts文件
3.可以通过各种手段(不仅是编程手段)把ts文件合并为一个MP4文件
爬取91看剧简单版
1.如果网页有视频但是网页源代码没有标签,可以断定是脚本生成(客户端渲染)
2.一种反爬机制
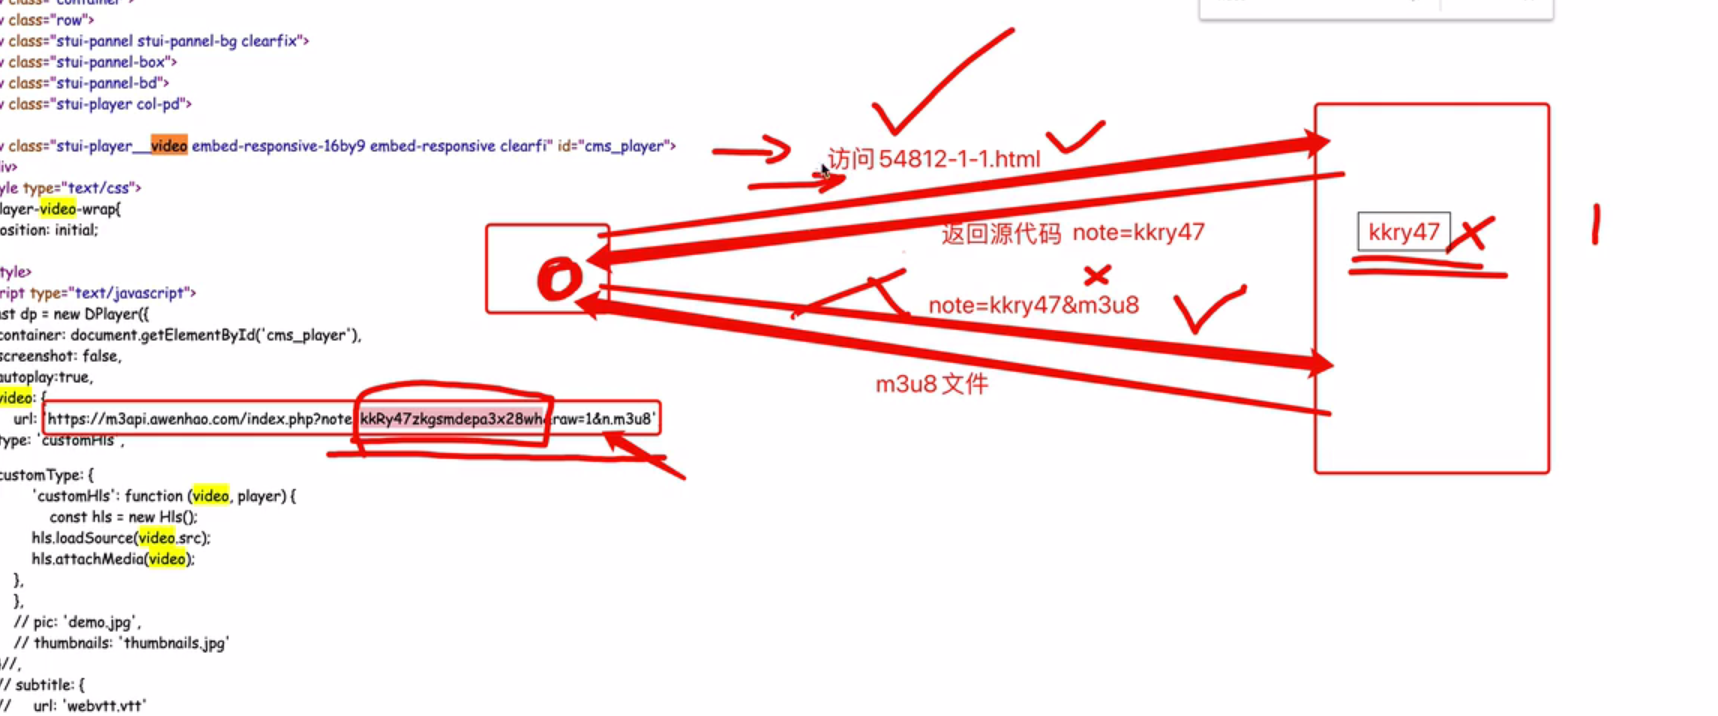
在前面如果你碰到了页面源代码里面没有想要的数据的时候,可以直接对有你想要的数据的url发起请求
但是在上面这种情况下,你必须对最开始的页面发起请求,获取相对应的url 再发起请求(url是动态变化生成的)
3.放在
while True:
    try:
        res1=requests.get(url='https://www.91kanju.com/vod-play/59859-1-1.html',headers=headers)
        break
    except:
        pass
5.文件的读取操作,平时用的不多所以有些疏忽
f.readlines()   一下读取所有,以列表形式储存
f.readline()     一下只读取一行,已经度过的下次不会再读
相关代码(这个是有问题的代码,正确的可以看下面)
# 'https://www.91kanju.com/vod-play/59859-1-1.html'
# #这是我要发起请求的网页,里面没有视频,但里面有我想要的,m3u8链接.
# #可是我在抓包工具中也能看到那么,为什么页面源代码里面也要放这个
#
# #所以我决定,先直接对我在抓包工具中看到的url发起请求
import requests
import re
headers={
    'User-Agent': 'Mozilla/5.0 (Windows NT 10.0; Win64; x64) AppleWebKit/537.36 (KHTML, like Gecko) Chrome/90.0.4430.72 Safari/537.36'
    }
#
#
# # res=requests.get(url='https://m3api.awenhao.com/index.php?note=kkRage296dk4853hqsnxt&raw=1&n.m3u8',headers=headers)
# # print(res)
# # print(1)
# '可以发现很奇怪,它提示我这个页面404,但是我明明看到这个页面url的啊'
#
# #我们再看了一下页面的源代码
# 'https://m3api.awenhao.com/index.php?note=kkRwn42dkmbyat9xh5g6c&raw=1&n.m3u8'
# #这是里面的链接可以和上面对一下
# 'https://m3api.awenhao.com/index.php?note=kkRage296dk4853hqsnxt&raw=1&n.m3u8'
# #会发现note对应的部分不一样,这意味着参数是在随机改变的.
#
# #那么需要这样
#
# #1.对指定的有视频的url发起请求
# while True:
#     try:
#         res1=requests.get(url='https://www.91kanju.com/vod-play/59859-1-1.html',headers=headers)
#         break
#     except:
#         pass
#
#
# html1=res1.text
# res1.close()
# #2.获取url,因为在script无法用xpath所以只能用re了
# findmu=re.compile(r"url: '(?P<mu_url>.*?)',",re.S)
# mu=findmu.search(html1).group('mu_url')
#
# #下面把获取到的m3u8数据下载下来
# f=open('E:\\2021年最新Python爬虫教程+实战项目案例(最新录制)\\爬虫文件保存\\瑞克和莫蒂第五季 第01集.m3u8','wb')
# f.write(requests.get(url=mu,headers=headers).content)
# f.close()
# '这里提一句,对于m3u8文件只需要知道不同的链接就是用来保存相关视频数据的(不带#号的)'

#获取对应的url
with open('E:\\2021年最新Python爬虫教程+实战项目案例(最新录制)\\爬虫文件保存\\瑞克和莫蒂第五季 第01集\\瑞克和莫蒂第五季 第01集.m3u8',\
          'r') as f:
    readlines=f.readlines()

i=1
headers1={
    'User-Agent': 'Mozilla/5.0 (Windows NT 10.0; Win64; x64) AppleWebKit/537.36 (KHTML, like Gecko) Chrome/90.0.4430.72 Safari/537.36',
    'location':'https://puui.qpic.cn/newsapp_ls/0/12918117609/0'
    }
for line in readlines:
    line=line.strip()
    if not line.startswith('#'):
    #获得对应链接开始下载
        res1=requests.get(url=line,headers=headers1)
        with open('E:\\2021年最新Python爬虫教程+实战项目案例(最新录制)\\爬虫文件保存\\瑞克和莫蒂第五季 第01集\\{}.ts'.format(i),\
                  'wb') as q:
            q.write(res1.content)
        print(line)
    i+=1
这个代码在最后面下载电影的地方有个问题,拿到的网址里面没有数据,应该是302的原因但是我又没找到referer
更改我又花时间看了下,问题应该在这里.
这是我m3u8里面获取到的url
https://m3api.awenhao.com/phls/OWU2OXhsYVRZaCtTbExkeGZwUDBwL2pIZnhsMG0xS2FTSzF3RzI2VUtRREFQNzNOcUF6TTVlK3IyeUlmZlR1cnR5L1IvL2hlckVDUFZ6d1pFQkFJWmFqbDBvVXBhSVJxeFNjZTB2aHZrSlpmR3NJMUg4eDBYZnVMQWFCd2VXT0V5REx2Y1BPalBiVlY1YVZjK2s3RWErU3JqVkw3eHZPRENhdnlqWW9jRHR4d2l4WUFmeEp3Y0pF
这个url里面啥数据也没有.但是她会对另外一个url发起请求,而那个url就是我要的
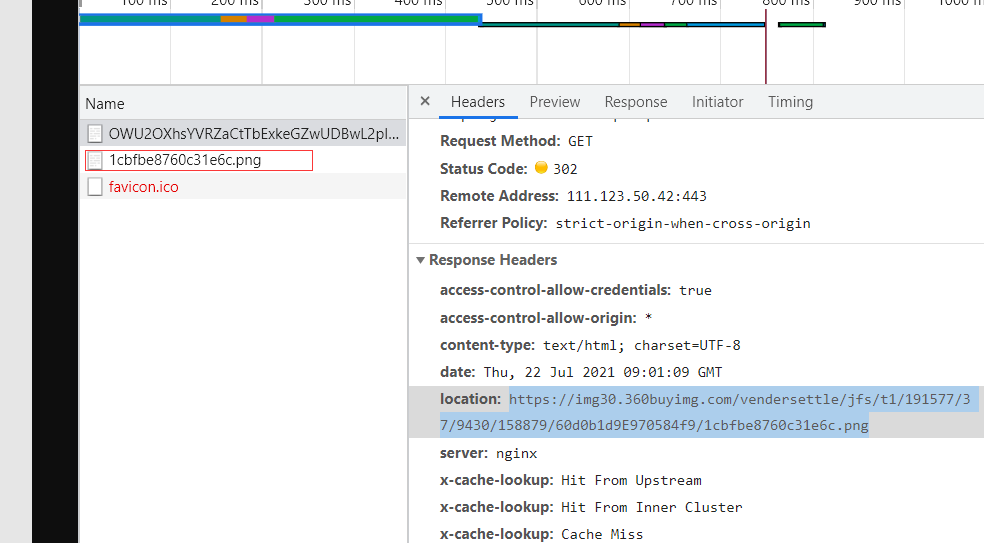
而在响应头 location里面有我要的url(你问我为什么要这个url???)
自己看
import requests
res=requests.get('https://img30.360buyimg.com/vendersettle/jfs/t1/191577/37/9430/158879/60d0b1d9E970584f9/1cbfbe8760c31e6c.png')

with open('E:\\2021年最新Python爬虫教程+实战项目案例(最新录制)\\瑞克和莫蒂第五季 第01集\\hh.ts','wb') as f:
    f.write(res.content)
你对他发起请求之后进行保存你是看的到的他就是个视频,可以看的视频,妈的
但是关键点来了
我操操操操操,我操操操操操操操操操操操操操操操.哈哈哈哈哈哈哈哈哈哈哈哈
气死我了,我花了一个小时看这玩意一直在想我的location为什么没有数据,结果现在告诉我
别挣扎了,我给你???
我不要妈的傻逼

解决办法是加res1=requests.get(url=line,headers=headers1,allow_redirects=False) 默认为True
(但是我最开始就是加了拿不到)
res1=requests.get(url=line,headers=headers1,allow_redirects=False)
对应代码
# 'https://www.91kanju.com/vod-play/59859-1-1.html'
# #这是我要发起请求的网页,里面没有视频,但里面有我想要的,m3u8链接.
# #可是我在抓包工具中也能看到那么,为什么页面源代码里面也要放这个
#
# #所以我决定,先直接对我在抓包工具中看到的url发起请求
import requests
import re
headers={
    'User-Agent': 'Mozilla/5.0 (Windows NT 10.0; Win64; x64) AppleWebKit/537.36 (KHTML, like Gecko) Chrome/90.0.4430.72 Safari/537.36'
    }


# res=requests.get(url='https://m3api.awenhao.com/index.php?note=kkRage296dk4853hqsnxt&raw=1&n.m3u8',headers=headers)
# print(res)
# print(1)
'可以发现很奇怪,它提示我这个页面404,但是我明明看到这个页面url的啊'

#我们再看了一下页面的源代码
'https://m3api.awenhao.com/index.php?note=kkRwn42dkmbyat9xh5g6c&raw=1&n.m3u8'
#这是里面的链接可以和上面对一下
'https://m3api.awenhao.com/index.php?note=kkRage296dk4853hqsnxt&raw=1&n.m3u8'
#会发现note对应的部分不一样,这意味着参数是在随机改变的.

#那么需要这样

#1.对指定的有视频的url发起请求
while True:
    try:
        res1=requests.get(url='https://www.91kanju.com/vod-play/59859-1-1.html',headers=headers)
        break
    except:
        pass


html1=res1.text

#2.获取url,因为在script无法用xpath所以只能用re了
findmu=re.compile(r"url: '(?P<mu_url>.*?)',",re.S)
mu=findmu.search(html1).group('mu_url')
print(mu)
print('----------------'*30)
#下面把获取到的m3u8数据下载下来
f=open('E:\\2021年最新Python爬虫教程+实战项目案例(最新录制)\\瑞克和莫蒂第五季 第01集\\瑞克和莫蒂第五季 第01集.m3u8','wb')
f.write(requests.get(url=mu,headers=headers).content)
f.close()
'这里提一句,对于m3u8文件只需要知道不同的链接就是用来保存相关视频数据的(不带#号的)'

#获取对应的url
with open('E:\\2021年最新Python爬虫教程+实战项目案例(最新录制)\\瑞克和莫蒂第五季 第01集\\瑞克和莫蒂第五季 第01集.m3u8',\
          'r') as f:
    readlines=f.readlines()

i=1

for line in readlines:
    line=line.strip()
    if not line.startswith('#'):
    #获得对应链接开始下载
        res1=requests.get(url=line,headers=headers,allow_redirects=False)
        location=res1.headers['location']
        res2=requests.get(url=location,headers=headers)
        with open('E:\\2021年最新Python爬虫教程+实战项目案例(最新录制)\\瑞克和莫蒂第五季 第01集\\{}.ts'.format(i),\
                  'wb') as q:
            q.write(res2.content)
            print(i)
        i+=1
19.爬取91看剧复杂版
iframe 网页嵌套网页 里面放的是另外一个网页
selenium
一些相关的操作在这个里面写的特别详细可以看一下
selenium相关操作
个人觉得这玩意是真的好用,当你只是个人使用,不去考虑相关的性能问题,用selenium准没错
操作简单(尤其是数据是加密的需要解密的情况,比如网易云音乐评论那里)
selenium:自动化测试工具
可以打开浏览器,然后像人一样的去操作浏览器
程序员可以从selenium中直接提取网页上的各种信息
这个是你需要安驱动的,我是谷歌浏览器,所以是谷歌驱动
安装教程
20.测试一下selenium
from selenium.webdriver import Chrome
#因为我是谷歌浏览器
#1.创建服务器对象
web=Chrome(executable_path='D:\\谷歌驱动器\\chromedriver.exe')
#2.打开一个网址
web.get('http://www.baidu.com')
21.selenium的各种操作
1.xpath即使你写的有问题他也不会报错只是会返回一个空列表
2.paused in debuggger当你打开抓包工具时可能会出现这种情况
解决方法
在这里插入代码片
21.1写一个requests的版本做对比
22.selenium窗口切换
#这里是拿b站试一下
#我觉得以我的技术对拉钩,是不需要指望了
from selenium import webdriver
import time
from selenium.webdriver import ActionChains
from selenium.webdriver.common.keys import Keys
options = webdriver.ChromeOptions()
prefs = {"":""}
prefs["credentials_enable_service"] = False
prefs["profile.password_manager_enabled"] = False
options.add_experimental_option("prefs", prefs)
options.add_experimental_option('excludeSwitches', ['enable-automation'])
#window.navigator.webdriver值为True,应将其改为False(判断是不是机器)
options.add_argument('--disable-blink-features=AutomationControlled')

#1.打开浏览器
bro=webdriver.Chrome(executable_path='D:\\谷歌驱动器\\chromedriver.exe',options=options)
bro.get("https://www.bilibili.com/")

#2.获取搜索栏
bro.find_element_by_xpath('//*[@id="nav_searchform"]/input').send_keys('爬虫',Keys.ENTER)
time.sleep(5)
# #3.点击我现在樵夫的爬虫课
# bro.find_element_by_xpath('//*[@id="all-list"]/div[1]/div[2]/ul/li[3]/div/div[1]').click()
#你会发现无论怎么样他都是会报错的,为什么呢?
'在selenium中新窗口默认是不切换过来的'

#调整到新窗口                 #浏览器的窗口(window_handles)
bro.switch_to.window((bro.window_handles[-1]))

#3.点击我现在樵夫的爬虫课
bro.find_element_by_xpath('//*[@id="all-list"]/div[1]/div[2]/ul/li[3]').click()

#关闭该窗口
bro.close()

#注意因为不自动切换所以需要你自己去弄
bro.switch_to.window((bro.window_handles[0])) #索引从0开始
除了上面这种直接的页面与页面间的切换
还有那种iframe的网页里面嵌套网页的切换
这里拿91看剧的网站写一下
#1.打开91看剧网站
bro.get('https://www.91kanju.com/vod-detail/54812.html')

print(bro.title)
#2.一样的先定位到iframe元素
iframe=bro.find_element_by_xpath('/html/body/div[3]/iframe[1]')
bro.switch_to.frame(iframe)
#bro.switch_to.default_content()   #切换回原页面
print(bro.find_element_by_xpath('//*[@id="cscpvrich7798_ab"]').text)
23.实现无头浏览器+爬取每年票房数据
1.如何实现无头
from selenium import webdriver
from selenium.webdriver.chrome.options import Options
option=Options()
option.add_argument('--headless')
option.add_argument('--disbale-gpu')
#1.打开浏览器
bro=webdriver.Chrome(executable_path='D:\\谷歌驱动器\\chromedriver.exe',options=option)
2.如何实现有下拉框的转换

这个是没办法直接定位到的
from selenium.webdriver.support.select import Select
#3.获得对应下拉框
select=bro.find_element_by_xpath('//*[@id="OptionDate"]')

"对元素进行打包包装成下拉菜单"
select=Select(select)
select.select_by_index(i)       #按照索引进行切换
后面的操作还是一样的,这里就已经转换页面了.但还是单个页面所以直接有定位的
text可以直接获得该节点下的所有文本
tbody=bro.find_element_by_xpath('//*[@id="TableList"]/table/tbody')  #这个页面没有增加货减少
print(tbody.text)
import time

from selenium.webdriver.support.select import Select
from selenium import webdriver
from selenium.webdriver.chrome.options import Options
option=Options()
option.add_argument('--headless')
option.add_argument('--disbale-gpu')
#1.打开浏览器
bro=webdriver.Chrome(executable_path='D:\\谷歌驱动器\\chromedriver.exe',options=option)

#2.发起请求
bro.get('https://www.endata.com.cn/BoxOffice/BO/Year/index.html')

#3.获得对应下拉框
select=bro.find_element_by_xpath('//*[@id="OptionDate"]')

"对元素进行打包包装成下拉菜单"
select=Select(select)
#4.开始循环获得每一年的
for i in range(len(select.options)):
    #按照索引进行切换
    select.select_by_index(i)       #按照索引进行切换
    time.sleep(2)               #需要发送请求
    tbody=bro.find_element_by_xpath('//*[@id="TableList"]/table/tbody')  #这个页面没有增加货减少
    print(tbody.text)
现在到了识别验证码的环节,这里我是直接用人家的超级鹰的.好用,便宜
超级鹰
24.超级鹰干超级鹰
1.可以直接对定位元素截图
im=bro.find_element_by_xpath(’’).screenshot_as_png
那些只有引号的地方是需要写用户名和密码的
from selenium import webdriver
from chaojiying import Chaojiying_Client
#1.打开浏览器
bro=webdriver.Chrome(executable_path='D:\\谷歌驱动器\\chromedriver.exe')

#2.发送请求
bro.get('https://www.chaojiying.com/user/login/')

#3.填入用户名,密码,验证码
bro.find_element_by_xpath('/html/body/div[3]/div/div[3]/div[1]/form/p[1]/input').send_keys('')
bro.find_element_by_xpath('/html/body/div[3]/div/div[3]/div[1]/form/p[2]/input').send_keys('')


#这里是定位到图片元素之后直接截图保存为png文件了
im=bro.find_element_by_xpath('/html/body/div[3]/div/div[3]/div[1]/form/div/img').screenshot_as_png
chaojiying = Chaojiying_Client('', '', '96001')
pic_str=chaojiying.PostPic(im, 1902)['pic_str']
bro.find_element_by_xpath('/html/body/div[3]/div/div[3]/div[1]/form/p[3]/input').send_keys(pic_str)


#点击登陆
bro.find_element_by_xpath('/html/body/div[3]/div/div[3]/div[1]/form/p[4]/input').click()
25.登陆12306
1.无论怎么拖动滑块,都无法成功.这是因为它识别出你是自动化工具,所以不放你走

添加下面代码就好了
from selenium.webdriver.chrome.options import Options
option=Options()
option.add_argument('--disable-blink-features=AutomationControlled')

#1.创建浏览器对象
bro=webdriver.Chrome(executable_path='D:\\谷歌驱动器\\chromedriver.exe',options=option)
from selenium import webdriver
from selenium.webdriver.common.action_chains import ActionChains
from chaojiying import Chaojiying_Client
import time
from selenium.webdriver.chrome.options import Options
option=Options()
option.add_argument('--disable-blink-features=AutomationControlled')

#1.创建浏览器对象
bro=webdriver.Chrome(executable_path='D:\\谷歌驱动器\\chromedriver.exe',options=option)

#2.发起请求
bro.get('https://kyfw.12306.cn/otn/resources/login.html')

time.sleep(2)

#3.定位到用户登陆并点击
bro.find_element_by_xpath('/html/body/div[2]/div[2]/ul/li[2]/a').click()

#4.输入用户名,密码
bro.find_element_by_xpath('//*[@id="J-userName"]').send_keys('12333333333333')
bro.find_element_by_xpath('//*[@id="J-password"]').send_keys('12333333333333333')

#5.定位到验证码,并用超级鹰识别
code=bro.find_element_by_xpath('//*[@id="J-loginImg"]')
    #5.1创建超级鹰对象,并识别
chaojiying = Chaojiying_Client('', '', '96001')
pic_str=chaojiying.PostPic(code.screenshot_as_png, 9004)['pic_str']


#6.对获得的坐标进行解析,点击
x_y_s=pic_str.split('|')
print(x_y_s)
for x_y in x_y_s:
    x_y=x_y.split(',')
    x=int(x_y[0])
    y=int(x_y[1])
    '这里记得需要释放操作,不然的话不回去执行,而且操作积压(perform)'
    ActionChains(bro).move_to_element_with_offset(code,x,y).click().perform()

#7.进行登陆
bro.find_element_by_xpath('//*[@id="J-login"]').click()

time.sleep(4)

#8.拉动弹出的滑块
huakuai=bro.find_element_by_xpath('//*[@id="nc_1__scale_text"]/span')
ActionChains(bro).drag_and_drop_by_offset(huakuai,huakuai.location['x'],0).perform()
原文链接:https://blog.csdn.net/qq_53183608/article/details/118794919
所属网站分类: 技术文章 > 博客
作者:新宫之晨
链接:http://www.pythonpdf.com/blog/article/502/71903ca8183deb0adba3/
来源:编程知识网
任何形式的转载都请注明出处,如有侵权 一经发现 必将追究其法律责任
昵称:
评论内容:(最多支持255个字符)